Macro Mode
Macro Mode allows you to automate sequences of actions in Bitwig Studio, combining both native Bitwig commands and BitwigBuddy's custom functions.
What is a Macro?
Macros in BitwigBuddy automate sequences of native Bitwig actions combined with custom commands, streamlining complex or repetitive tasks. Bitwig Actions correspond almost entirely to the list of Bitwig keyboard shortcut commands, including the not mapped ones.
Use Cases
- 🔁 Repetitive tasks
- ↗️ Alternative workflows
- 🧑🏫 Tutorials and demos
- 💡 Prototyping ideas for other Bitwig Extensions
User Interface
Macro Panels
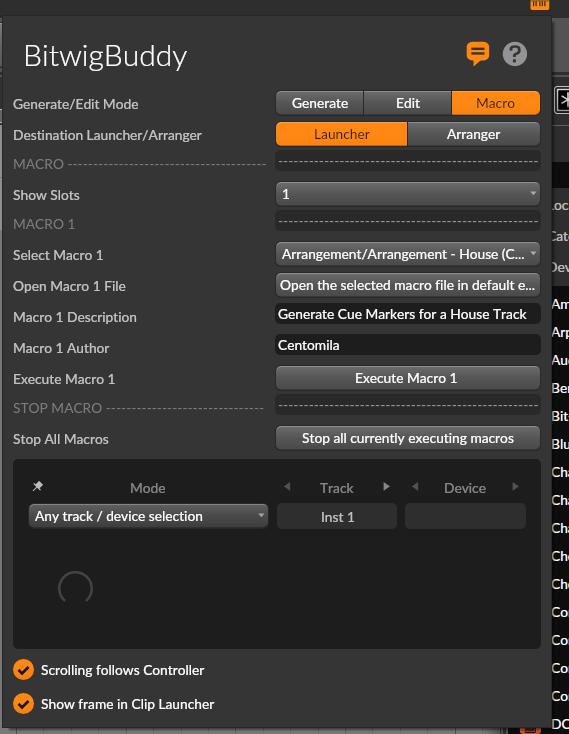
Macro Slots (1-4)
Macros stored in the BitwigBuddy/Macros folder:
- Show Slots: Change slot view, switch to Instant Macro mode or hybrid mode
- Select Macro: Choose a macro sequence to execute
- Open Macro File: Open the selected macro file in your default text editor
- You can edit your file and save it to apply changes without restarting BitwigBuddy
- Macro Description: Shows the description of the selected macro
- Macro Author: Shows the author of the selected macro
- Execute Macro: Run the selected macro
- Stop All Macros: Stop the execution of all running macros

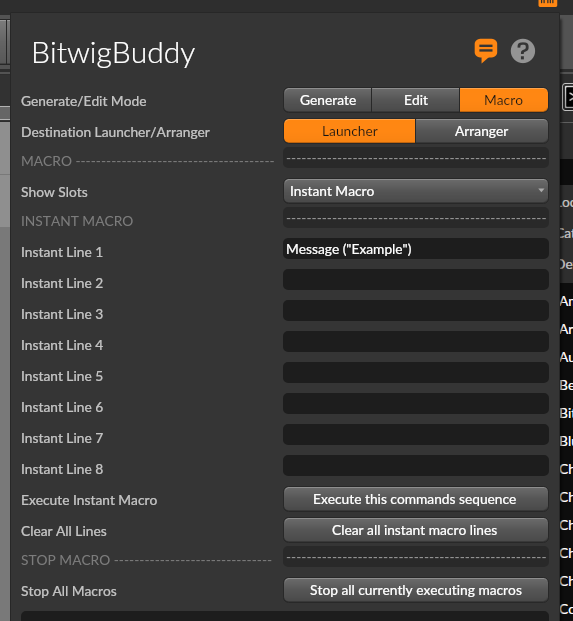
Instant Macro Mode
Define up to 8 quick-execute actions:
- Instant Macro Field: Enter custom commands for quick execution
- Action Buttons 1-8: Execute corresponding instant macro command
- Save Instant Macros: Store your current instant macro setup
- Load Instant Macros: Recall previously saved instant macro configurations
Panel Modes
BitwigBuddy Panel offers different viewing modes:
- Standard Mode: Shows all four macro slots with full information
- Compact Mode: Displays reduced information for each slot to save screen space
- Hybrid Mode: Combines instant macros with regular macro slots
- Instant Only: Shows just the instant macro interface for maximum simplicity
Creating Macros
Macro File Structure
Macros are stored as .txt files in the BitwigBuddy/Macros folder. You can organize them into subfolders for better management.
Every macro file begins with metadata:
Macro: "My Example Macro"
Description: "This is an example macro that creates a drum track"
Author: "Your Name"
Following the metadata, each line contains a command to be executed:
Macro: "Create Drum Track"
Description: "Creates a new track with Drum Machine"
Author: "BitwigBuddy User"

Create Instrument Track
Track Rename("Drums")
Insert Device("Drum Machine")
Wait(500)
Select Drum Pad("C1")
Insert Device("Kick V4")
Macro Syntax
Macros follow these syntax rules:
- Commands are case-sensitive
- Many commands require parameters in parentheses
- Parameters can be:
- Strings:
"This is a string" - Integers:
-1, 0, 1, 2, 3 - Floats:
-2.5, 0.0, 1.2, 420.42 - Booleans:
true/false
- Strings:
- Comments start with
//and are ignored during execution- Inline comments are not supported, so use separate lines for comments
Variables and Loops
BitwigBuddy macros support variables and loops for more advanced automation:
Variables
Define and use variables throughout your macro.
- Variables are defined with
var. - Variables are called with
${varName}.
var clipLength = 4
var trackName = "Drums"
var basePosition = 2

// Use variables in commands with ${varName}
Clip Create(${basePosition}, ${clipLength})
Track Rename(${trackName})
For Loops
Repeat commands with an incrementing counter:
// Basic for loop syntax
for (i = 1 to 4) {
    Clip Create(${i}, 4)
    Clip Color("#FF0000")
}
Notes
- Loops can't be nested inside each other.
- i can be named anything, but it's common to use i or other single-letter names for loop counters.
- Loop counter variables are only valid inside their respective loops
Math Expressions
Perform calculations within variable references:
var baseLength = 2

// Create clips with increasing lengths
for (i = 1 to 8) {
    // Create clip where position = i, length = i * baseLength
    Clip Create(${i}, ${i*baseLength})
}
Supported operators:
- Addition:
+ - Subtraction:
- - Multiplication:
* - Division:
/
Tips for Working with Macros
- Save your work before running complex macros! Each action is recorded as an undo step.
- Make sure opening
{and closing}braces are properly matched in loops - Variables defined outside loops are accessible inside loops
- To automatically close the BitwigBuddy Panel, use the command
BB Close Panel.
Available Actions
Macros can use two types of actions:
Bitwig Native Actions: All actions available in Bitwig's keyboard shortcuts system
- See the Bitwig Actions Reference for a complete list
BitwigBuddy Custom Actions: Special operations provided by BitwigBuddy
- See the BitwigBuddy Actions Reference for a complete list
Example Macros
Here's a simple example that creates a 8 tracks with different colors and names:
Macro: "Create 8 Tracks"
Description: "Create eight tracks with colors: Drums, Bass, Bass 2, Pad, Keys, Lead, Arp, and Vocals."
Author: "Centomila"

// Track 1: Drums (Red)
Create Instrument Track
Track Color ("D32F2F")
Track Rename ("Drums")

// Track 2: Bass (Green)
Create Instrument Track
Track Color ("43A047")
Track Rename ("Bass")

// Track 3: Bass 2 (Teal)
Create Instrument Track
Track Color ("00897B")
Track Rename ("Bass 2")

// Track 4: Pad (Violet)
Create Instrument Track
Track Color ("7B1FA2")
Track Rename ("Pad")

// Track 5: Keys (Yellow)
Create Instrument Track
Track Color ("F9A825")
Track Rename ("Keys")

// Track 6: Lead (Cyan)
Create Instrument Track
Track Color ("00ACC1")
Track Rename ("Lead")

// Track 7: Arp (Fuchsia)
Create Instrument Track
Track Color ("C2185B")
Track Rename ("Arp")

// Track 8: Vocals (Pink)
Create Audio Track
Track Color ("EC407A")
Track Rename ("Vocals")

Track Select (1)
Wait (100)
Insert Device ("Drum Machine")
Sharing Macros
The BitwigBuddy community benefits from shared macros! Consider sharing your useful macros on:
- The GitHub repository as examples
- Community forums and discussions
- Social media with other Bitwig users
When sharing macros, always include clear descriptions and comments to help others understand how they work.